Raspberry-Coco-Nana Smoothie

Summer time is perfect for smoooooothies! This morning I came up with a really yummy combo of raspberries, coconut and banana, which inspired me to take some nice photos of it and share the recipe with you guys. And how cute is anything served in a coconut? I mean, seriously! I love coconut so much. I really am in love with da coco! I love all forms of it…coconut water, coconut milk, shredded, flaked, young, old…I don’t discriminate. If you would like to know how to open a mature (brown) coconut, here is short video with easy instructions. It really is easier than I had expected. In fact I find it easier than opening young coconuts!

When picking out a mature coconut you want to pick one that doesn’t appear to have any signs of mold on it, and it should feel heavy for its size. If you shake it, you should hear the coconut water inside. Usually young coconuts will have more water inside, but that is not always the case. I opened a young coconut last night and got 1.5 cups of water out of it, whereas I got 2.25 cups out of the mature one. So I guess it really depends on the coconut you get.

Both young and mature coconut waters are delicious and super healthy for you, and naturally taste much better than any packaged coconut water! You can drink them as is or use them in all kinds of recipes. The taste is almost identical, however the coconut meat from mature coconuts is completely different than that of young coconuts. Young coconut meat is soft and can easily be scooped out with a spoon. It’s lovely to eat on its own or make into a delicious raw coconut yogurt for example. Mature coconut meat on the other hand, is much harder in texture as well as harder to get out of the husk. Be careful when trying to get it out. Use a small paring knife and slide it between the meat and the shell to remove. You can leave the thin brown “skin” that you are left with or if it bothers you, you can remove it using a vegetable peeler. Cut the coconut meat into smaller pieces and store in the refrigerator for snacking or using in recipes. Note: It’s not good for smoothies, as it’s too hard to blend. You can also freeze it until you need it. And if that’s not enough options for you, you can also bake it and then shred it instead of buying shredded coconut from the store!

Ok I think I’ve rambled on enough about coconut and how amazing and versatile it is, so let’s move on to the smoothie of the day! You will need to use a frozen banana for this, which will result in an ice-cream like treat. Um hello…..yummmmm! It’s a good idea to always have some bananas in the freezer ready to go. Greek yogurt also adds to the creaminess of the smoothie, but if you live somewhere where you can get coconut yogurt I bet that would be even better. I used some of the coconut water that I got out of the mature coconut for the liquid in the smoothie and I added some flaked coconut just to enhance that coconut flavor. Finally throw in some frozen raspberries and blend until smooth. Feel free to top your smoothie bowl with other fruits, nuts or seeds and if you’re feeling adventurous have a go at cracking a mature coconut and eat your smoothie out of it. Happy summer! xoxo

Raspberry-Coco-Nana Smoothie

by: Totes Yummy

Serves 1

Ingredients:

  • 1 large frozen banana
  • 3/4 cup frozen raspberries
  • 1/2 cup greek yogurt (I used FAGE 0%)
  • 1/4 cup coconut water
  • 2 tbsp unsweetened flaked coconut

Directions:

Add all ingredients into a blender. Blend until smooth. Serve immediately as is or topped with your favorite toppings. I topped mine with flaked coconut and fresh blueberries. Enjoy!

(Nutrition for smoothie without toppings: 300cal, 7g fat, 47g carbs, 7g fiber, 16g protein)

Breakfast Art


So my newest obsession is breakfast art! What da heck is breakfast art you say? Well, I am not sure if this is some kind of an official name for it, but it’s pretty much beautifully arranged breakfast…duh! As for me personally, I decided to concentrate on pretty things in bowls, as I call them. What inspired this was seeing a lot of beautiful photos of food on instagram, specifically smoothie, yogurt and oatmeal bowls. People are getting really creative with these, and I just find it so inspiring that I had to try to create some of my own. I know some people don’t like photos of food and are probably sick of seeing me post meals on my instagram all the time, but I personally love food photos…if they are pleasing to the eye that is! So I thought, why not start my day, with my favorite meal of the day as I always do, but combine it with some art and creativity. Well let me tell you, it’s been really fun creating these and they are damn delicious, very filling and super healthy too. So I wanted to share the simple recipes for the six breakfast bowls I created this week, in case some of you want to try them out and maybe even have a go at some breakfast art yourselves! I can tell you that it’s a very calming, therapeutic, and fun way to stay your day. xoxo


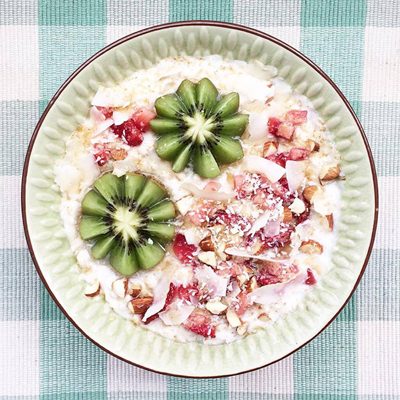
Overnight Oats with Kiwi, Strawberries, Almonds, Coconut & Maple Syrup
(serves 1)

Ingredients:

  • 1/2 cup rolled oats (not instant oats)
  • 1/2 cup coconut milk (I used Coconut Dream)
  • 1/4 cup greek yogurt (I used FAGE 0%)
  • 1/2 tsp vanilla extract or vanilla bean paste
  • 1 kiwi fruit
  • 2 strawberries
  • few chopped unsalted almonds
  • 1/2 tsp unsweetened shredded coconut
  • 1 tsp unsweetened coconut flakes
  • 1 tsp maple syrup


Directions:

Combine the rolled oats, coconut milk, greek yogurt and vanilla in a bowl. Cover and allow to sit in the fridge overnight for the oats to soften. Top the overnight oats with fruit, nuts and seeds of your choice. I used kiwi fruit, strawberries, chopped almonds, shredded and flaked coconut. Drizzle your breakfast art arrangement with a teaspoon of maple syrup. Enjoy! And don’t forget to document your art!

(Nutrition: 375cal, 11g fat, 53g carbs, 8g fiber, 16g protein)

*Nutritional values are for the exact breakfast bowl I made. Values will obviously vary depending on your toppings, but you can use this as a general idea if you are tracking your calories and nutrients.


Vanilla Bean Greek Yogurt with Fresh Fig, Granola, Almonds, Coconut & Honey
(serves 1)

Ingredients:

  • 1 cup greek yogurt (I used FAGE 0%)
  • 1/2 tsp vanilla bean paste or 1/2 vanilla pod scraped
  • 2 tbsp granola (I used Honey-Almond Crunch Granola)
  • few chopped unsalted almonds
  • 1 fresh ripe fig
  • 1 tsp unsweetened shredded coconut
  • 1 tsp organic raw honey


Directions: 

Whisk the greek yogurt with vanilla bean until smooth. Top with granola, almonds, sliced fig and shredded coconut. Drizzle with honey and enjoy! This combination of flavors is really amazing, it was my favorite of the six, so it’s definitely a must-try!

(Nutrition: 335cal, 8g fat, 38g carbs, 4g fiber, 29g protein)

*Nutritional values are for the exact breakfast bowl I made. Values will obviously vary depending on the kind of yogurt you use as well as your toppings, but you can use this as a general idea if you are tracking your calories and nutrients.


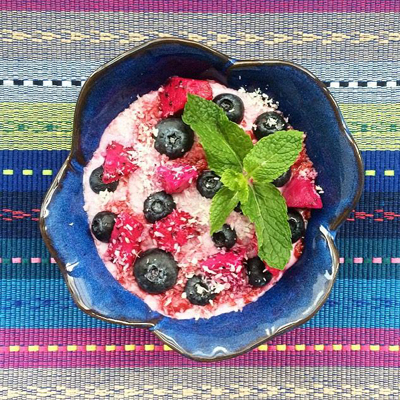
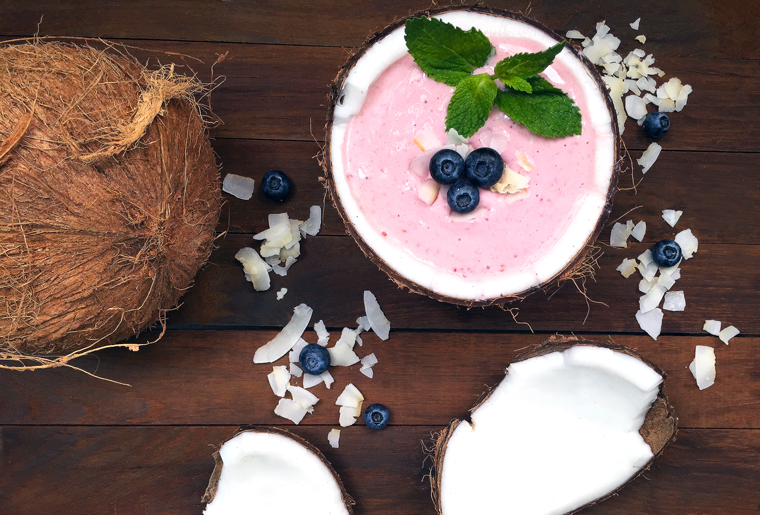
Berry Greek Yogurt with Blueberries, Dragon Fruit, Coconut & Fresh Mint
(serves 1)

Ingredients:

  • 1 cup greek yogurt (I used FAGE 0%)
  • 1/2 cup mixed fresh/frozen berries (I used fresh blueberries & frozen raspberries)
  • fresh lemon juice (from 1/2 lemon)
  • 3 drops liquid stevia
  • few fresh blueberries
  • few pieces of chopped purple dragon fruit
  • 1 tsp unsweetened shredded coconut
  • fresh mint for garnish


Directions:

In a small saucepan combine 1/2 cup of berries, lemon juice and stevia. Heat on medium until the berries start to soften. Mash the berries with a fork and allow the mixture to cook for a few minutes until it resembles a jam. Cool for a few minutes while you prepare the rest of the ingredients. Place the greek yogurt in a bowl and stir in the berry “jam”. I wanted mine to look like a berry swirl, but I mixed it one too many times so I ended up with pink yogurt instead. Delicious just the same, but if you want a berry swirl just do one or two gentle stirs. Top with fruit, nuts and seeds of your choice. I used fresh blueberries, purple dragon fruit, shredded coconut and fresh mint as garnish. This is a very refreshing combination, perfect for the summer!

(Nutrition: 245cal, 1g fat, 34g carbs, 6g fiber, 27g protein)

*Nutritional values are for the exact breakfast bowl I made. Values will obviously vary depending on the kind of yogurt you use as well as your toppings, but you can use this as a general idea if you are tracking your calories and nutrients.


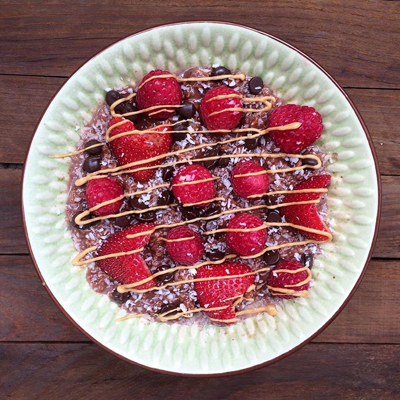
Chocolate Oatmeal with Strawberries, Raspberries, Chocolate Chips, Coconut & Peanut Butter Drizzle
(serves 1)

Ingredients:

  • 1/2 cup rolled oats (not instant oats)
  • 1 cup water
  • 3 drops liquid stevia
  • 1 tbsp unsweetened dutch process cocoa
  • 2 tbsp coconut milk (I used Coconut Dream)
  • 1 tbsp dark chocolate chips
  • 1 tsp unsweetened shredded coconut
  • 1 tsp smooth peanut butter
  • few fresh strawberries
  • few fresh raspberries

Directions:

In a small saucepan, bring water and oats to boil. Reduce heat to low, add stevia and cocoa powder. Continue to cook on low until the water is absorbed, around 10 minutes. Transfer the chocolate oatmeal to a bowl and pour the coconut milk on top. Stir to combine. Top with fresh strawberries and raspberries, shredded coconut and dark chocolate chips. Finally heat a teaspoon of peanut butter in the microwave for 10 seconds to soften. Drizzle over your breakfast art and enjoy!

(Nutrition: 310cal, 10g fat, 49g carbs, 12g fiber, 11g protein)

*Nutritional values are for the exact breakfast bowl I made. Values will obviously vary depending on your toppings, but you can use this as a general idea if you are tracking your calories and nutrients.


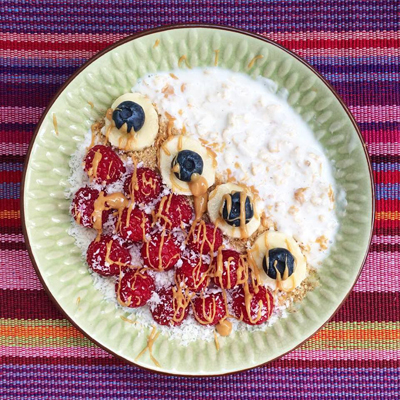
Overnight Oatmeal with Toasted Wheat Germ, Banana, Raspberries, Coconut & Peanut Butter Drizzle
(serves 1)

Ingredients:

  • 1/2 cup rolled oats (not instant oats)
  • 1/2 cup coconut milk (I used Coconut Dream)
  • 1/4 cup greek yogurt (I used FAGE 0%)
  • 1/2 tsp vanilla extract or vanilla bean paste
  • 1/2 banana
  • 1/2 cup fresh raspberries
  • few fresh blueberries
  • 1 tsp toasted wheat germ
  • 1 tsp unsweetened shredded coconut
  • 1 tsp smooth peanut butter

Directions:

Combine the rolled oats, coconut milk, greek yogurt and vanilla in a bowl. Cover and allow to sit in the fridge overnight for the oats to soften. Top the overnight oats with fruit, nuts and seeds of your choice. I used fresh raspberries, banana, blueberries, shredded coconut, and toasted wheat germ. As a finishing touch, heat a teaspoon of peanut butter in the microwave for 10 seconds to soften. Drizzle over your breakfast bowl of delicious art and enjoy!

(Nutrition: 365cal, 10g fat, 53g carbs, 11g fiber, 17g protein)

*Nutritional values are for the exact breakfast bowl I made. Values will obviously vary depending on the kind of yogurt you use as well as your toppings, but you can use this as a general idea if you are tracking your calories and nutrients.


Blueberry Swirl Greek Yogurt with Blueberries, Mango, Toasted Wheat Germ & Shredded Coconut
(serves 1)

Ingredients:

  • 1 cup greek yogurt (I used FAGE 0%)
  • 1/2 cup fresh/frozen blueberries (I used fresh blueberries)
  • fresh lemon juice (from 1/2 lemon)
  • 3 drops liquid stevia
  • handful of fresh blueberries
  • 1/2 mango, sliced
  • 1 tsp toasted wheat germ
  • 1 tsp unsweetened shredded coconut


Directions:

In a small saucepan combine 1/2 cup of blueberries, lemon juice and stevia. Heat on medium until the berries start to soften. Mash the berries with a fork and allow the mixture to cook for a few minutes until it resembles a jam. Cool for a few minutes while you prepare the rest of the ingredients. Place the greek yogurt in a bowl and gently stir in the berry “jam”. Top with fruit, nuts and seeds of your choice. I used fresh blueberries, mango, toasted wheat germ, and shredded coconut. Enjoy!

(Nutrition: 240cal, 1g fat, 33g carbs, 4g fiber, 27g protein)

*Nutritional values are for the exact breakfast bowl I made. Values will obviously vary depending on the kind of yogurt you use as well as your toppings, but you can use this as a general idea if you are tracking your calories and nutrients.

Skinny Chocolate-Banana Muffins

OMG it has been way too long! I don’t even wanna know how long, but I am definitely way over due for a post. I have been collecting recipes and taking photos, but it’s these truly amazing muffins that finally made me sit down and write a post cause they are just THAT goooooood!

I always eat healthy in general, but I do have my cheat meals and cheat days to say the least. For the last couple of months I haven’t been the most consistent in my healthy ways, but I am off to Thailand again for a mini-vacay in a few weeks, so that has definitely made me get serious about my health and fitness. Nothing like having to hang around in your bikini all day to make you get off your butt, ain’t that the truth?

Well on that note, in comes my sweet tooth. I don’t care how much motivation and determination I have to eat healthy, my sweet tooth will always come knocking. I will be fine all day, eating my super healthy breakfasts, lunches and dinners, but then a couple of hours after dinner there it comes. Knock knock! At this point there is nothing else I can do but give in and have something sweet, but I feel much better about it when I can satisfy the sweet tooth with something healthy and low in calories. One of my favorite late night snacks are freshly baked muffins with a cup of tea. They are so versatile in flavors and completely satisfy my sweet tooth, and I can’t complain about a midnight snack that translates into ready-made breakfast for the following morning. Now, after endless experimentation with healthy muffins (most failing to actually be healthy and low-calorie at the same time or completely failing to actually taste good), I have finally come up with the mother of all healthy muffins that are OF COURSE totes yummy too!

First of all, how can you go wrong with a chocolate and banana combo? You can’t! It is a match made in heaven. But to get muffins that are sweet, satisfying, yummy, healthy and low in calories, it definitely took a few failed efforts of less than desirable baked goods. Not only do these taste amazing, with chocolate and banana both shining through, but the consistency of these muffins is just perfect, if I may say so myself! They are soft and light, yet perfectly dense and they stay that way for 3 days (if they last that long that is).

So what makes them healthy you say? Well, they are sweetened with coconut sugar, which has a lower glycemic index, meaning it doesn’t spike your blood glucose and insulin like table sugar does. It uses unsweetened cocoa powder and dark chocolate chips for the chocolate components. As for the fat, which every good muffins needs for moisture, it comes from a little bit of organic coconut oil and some greek yogurt. The flour used in the recipe is oat flour, and instead of using whole eggs I used 2 egg whites. Finally, throw in a few ripe bananas in there, not only for added moisture and the amazing flavor to go with chocolate, but also for the fiber and other nutrients that bananas as a fruit provide. So as you can see, there is nothing bad in these, and at only 150 calories a piece (which I can tell you is quite low for a muffin that actually tastes good), these chocolate-banana muffins are a must-try for anyone that loves baked goods and is watching their diet. As a matter of fact, these have now become my all time favorite muffins, bar none! So even if you are not on a diet and just want a tasty muffin, you are in the right place my friend. Without further ado, here is my recipe for skinny chocolate-banana muffins. Now go make them, you won’t regret it! xoxo

Skinny Chocolate-Banana Muffins

by: Totes Yummy

Makes 10 regular sized muffins

Ingredients:

  • 2 large egg whites
  • 1/2 cup coconut sugar
  • 2 tbsp coconut oil
  • 1/4 cup greek yogurt
  • 1/2 tsp vanilla bean paste or 1 tsp vanilla extract (I used vanilla bean paste)
  • 1  1/4 cup mashed ripe bananas (about 3 bananas)*
  • 1 cup oat flour, sifted
  • 1/2 tsp baking soda
  • 1/2 tsp baking powder
  • 1/2 tsp salt
  • 1/4 cup dutch process cocoa powder
  • 1/4 cup dark chocolate chips (optional, but oh so worth it!)

Directions:

Preheat oven to 350 °F (175 °C). Grease muffin tin or use paper liners for easier clean up. Whisk together the egg whites, coconut sugar, coconut oil, greek yogurt, vanilla, and bananas. Combine the dry ingredients in a separate bowl, then add to the wet. Mix just until combined. Fill prepared muffin tin or paper liners around 3/4 of the way. Add some chocolate chips on top of each muffin (if using). Bake for about 20 minutes. Let cool in muffin tin for 5-10 minutes, then transfer to a wire rack and allow to cool completely. Top with a strawberry or other berries if you like, or eat just as they are with a cup of tea or coffee for a perfect midnight snack or breakfast. Store on the counter in an air-tight container for 3 days.

*note: I would usually use very ripe bananas for baking, but this time I only had fresh bananas so I used those. They turned out awesome, but I would imagine they might be even better using more ripe bananas.

(Nutrition per muffin: 150cal, 5.5g fat, 23.7g carbs, 2.5g fiber, 3.5g protein)

**note: If you omit dark chocolate chips each muffin will be only 127cals.

Pomegranate Coucous Salad

Pomegranate is one of my all time fave fruits. I love it when I find nice, super red poms that are bursting with sweetness, while at the same time being slightly tangy. When I was a kid, my grandpa would always get these giant pomegranates that we would gladly devour, but not so gladly de-seed. De-seeding pomegranates really is a pain, or should I say it used to be. Since I was a kid I’ve discovered that it’s much easier to de-seed poms under water, plus there is this other super quick and easy way to de-seed them within seconds. You basically need to cut the pom in half and then use a heavy spoon to whack it and the seeds just fall out! Yeap I said it, they just fall out! If you don’t believe me, check out this method in a quick video tutorial here. So now that you know easy ways to de-seed these amazing fruits, there is no excuse not to eat them! They are so good for you and besides just eating them with a spoon out of a bowl (my fave), you can also add these lovely red morsels into salads, yogurt/froyo, various desserts as well as many savory dishes.

Today I decided to get creative with the pomegranate I got and make a couscous salad with it. I think couscous is such a lovely dish, especially as a salad in the summertime. Add some pomegranate seeds, nuts, greens and a light dressing and you’ve got yourself a perfect side dish for a lunch, dinner or a summer bbq. When it comes to the dressing, you wanna keep it light. I created the dressing using lemon, garlic infused olive oil, little bit of salt & pepper, mixed italian seasoning, and some pomegranate juice from crushed seeds.

I still had some curly kale so of course I didn’t miss an opportunity to add some of my new green best friend in there along side of some slivered almonds. You can get creative with this and use different kinds of nuts, such as pine nuts or even pistachios! Pine nuts are the nuts commonly used with couscous, but I wanted to try something different so I used almonds. This salad is really a quick and easy dish that doesn’t take much effort at all. I think it would go amazingly well with barbecued prawns or fish in particular. Or you can do what I did and top it with a poached egg and some hot sauce and call it a meal! xoxo

Pomegranate Couscous Salad

by: Totes Yummy

Makes 6 one cup servings

Ingredients:

  • 1 cups uncooked couscous
  • 1.5 cups water
  • 1 tbsp olive oil
  • pinch of salt
  • seeds of 1 pomegranate (mine came out to around 1 cup)
  • 1/2 cup slivered almonds
  • 1 cup fresh curly kale, chopped

For the dressing:

  • handful of pomegranate seeds
  • juice of 1/2 lemon
  • 1 tbsp garlic infused olive oil
  • 1 tsp mixed italian seasoning
  • salt and pepper to taste

Directions:

Pour 1.5 cups water into a small saucepan. Add 1 tbsp of olive oil and a pinch of salt. Bring to boil over high heat. Once boiling add 1 cup of couscous, stir, and immediately remove from heat. Cover and let sit for 5-6 minutes. Gently break apart and fluff the cooked couscous with a fork, then transfer to large bowl to cool. While the couscous is cooling, de-seed your pomegranate (check out easy de-seeding methods mentioned above). Chop the curly kale into small pieces and measure out your slivered almonds. Add everything to cooled couscous. For the dressing, crush a handful of pomegranate seeds then strain and keep the juice. Add the rest of the dressing ingredients and mix until combined. Pour dressing over salad and toss lightly. Serve immediately or refrigerate until needed. It will keep in the fridge for 3 days in an air tight container.

(Average nutrition per 1 cup serving: 200cal, 7g fat, 30g carbs, 2.7g fiber, 5.8g protein)

Chunky Fresh Salsa

There is just one decent Mexican restaurant in Macau, where I currently live. The place is pretty good considering that it’s Mexican food in China! They always serve you some fresh salsa and homemade tortilla chips when you sit down and the salsa is really yummy! It is always devoured within minutes of being placed on the table. So yeah, it’s good. And so one day I decided to try and make a copycat version at home, and not that I am bragging or anything, but everyone who has tried it says that it’s even better than the restaurant’s one!

This salsa is easy to make and you’ll only need a few ingredients. You’ll want to get nice fresh tomatoes for this, not too ripe and soft because this salsa is not mushy at all and you are suppose to taste the freshness of the produce. I usually use a mix of regular tomatoes and cherry tomatoes, but you can use all regulars if you wish. I only use the cherry ones because they taste way better than the regular sized tomatoes that I am able to get here. But of course the cherry ones are much more of a pain to cut into little pieces. The true secret here is having a super sharp knife. If you take anything away from this it should be that. A good sharp knife will seriously make your life easier, at least when it comes to this recipe because it’s all about chopping.

Another secret is that you really shouldn’t follow the measurements much and just kind of customize the salsa to your own liking. I don’t skimp on cilantro/coriander in my salsa, but that’s also a personal taste. I usually don’t even like cilantro, but I do in salsa. I add spice with pickled jalapeños from a jar, as well as some of that juice they are in. Once again, you can totally customize how spicy you want it to be by adding more or less jalapeños or omitting them completely. I personally like my salsa nice and spicy. When I make this I usually make a huge jar so that it lasts a while. It totally doesn’t though, it’s usually gone within three days. I have also made this for bbq’s and it is always a huge hit. Just grab some of your favorite tortilla chips and you are good to go. My fave are the Garden of Eatin’ Restaurant Style White Chips. If you haven’t tried them you totes should. They are a perfect size for salsa dipping and are made from organic, non-GMO corn. But if you are trying to avoid chips altogether, there are plenty of other ways to use your chunky fresh salsa, such as in homemade burritos or tacos, omlettes or other kind of egg dishes, or even in a variation of bruschetta. Now go grab a few of these fresh ingredients and a super sharp knife and get choppin’. xoxo

Chunky Fresh Salsa

by: Totes Yummy

Makes 1 big jar

Ingredients:

  • 5-6 large tomatoes
  • 1 bunch/vine of cherry tomatoes
  • 1 medium red onion
  • 1 bunch of cilantro/coriander
  • 1 lemon
  • pickled jalapeños & jalapeño juice (optional)
  • salt and pepper to taste

Directions:

Chop the tomatoes and onion into little pieces with a very sharp knife. Next, chop the cilantro into fine pieces, discarding the thick stems. In a medium bowl, mix the tomatoes, onion, and cilantro. Add juice of 1 lemon. To add spice to the salsa, chop some jalapeños from a jar and add them to the mix. You may also add some of the jalapeño juice from the jar for an additional kick. Finally season with salt and pepper and mix it all up. Store in a covered jar in the fridge for up to 5 days. Best if eaten within 3 days. But trust me, this salsa is so good, that won’t even be a problem.

(Average nutrition per 100g of salsa: 25cal, 0.3g fat, 5g carbs, 1g fiber, 1g protein)

Kale-Avocado Power Smoothie

I know, I know, I have totes slacked off on Totes Yummy lately, but instead of listing excuses I will just fess up and admit that I don’t have a legit excuse and that I will try to post more regularly again. I have been waiting for something to spark my imagination and give me that extra nudge to get off my ass and make a new post…and you’ll never believe what it was. KALE! Ok well, maybe you’d already guessed it from the title, but still, I’d say that’s pretty shocking. I know people who hate kale. And let me tell ya, I do too…when it’s cooked that is! Now when it comes to fresh kale it’s a whole different story. It just tastes so refreshing and good, and the fact that it’s so darn good for you just adds to the excitement. Kale is, as you may know, a supefood. It is a low-calorie, high fiber, nutritional powerhouse, containing all kinds of vitamins and minerals that our bodies need. Some are even calling Kale “the new beef”, because per calorie, kale actually contains more iron than beef! But in any case, unless you’ve been living under a rock, I am sure you know kale is good for you. So let’s move on to the main ways of preparation. There is the (imho) dreadful cooked kale, there are fresh kale salads (super yum), and then there are smoothies. Smoothies are the easiest way to add kale to your diet, even if you don’t particularly love the taste of it. The other components of the smoothie can successfully cover up most of the kale taste if that is what you are trying to achieve. But for me, the taste of kale is what makes the smoothie! I love that refreshing vegetable “green” taste. Maybe it’s something subliminal, and it just makes me feel like I am being super healthy and stuff, I don’t know, but I sure love it.


My kale obsession started just recently because they finally got curly kale where I live. I know that may sound bizarre to most of you, but I live in Macau where we don’t really have access to all the fruits and veggies we would like to have. Before, all I could find is Chinese Kale and I absolutely hated it. It tastes nothing like curly kale. So you can imagine my excitement when I spotted the good stuff. I grabbed a few bunches because another annoying thing that happens here all the time, is that they will get cool new products at the supermarket and then once they run out they never get them again. Makes total sense right? No? Didn’t think so. Yet this is my reality while I am living here, so I gotta do what I can. Naturally that means I ended up freezing a whole bunch of fresh kale. It freezes really well, but just for things like soups and smoothies. I don’t think you’d wanna use it in salads after you freeze it. Of course I am hoping that they will get more kale at the grocery store, but if they don’t at least I’ll have a bunch of smoothies with the stuff I got so far. That is until I count down to the last little frozen zip lock baggie with the last remains of my precious kale, and then cry…ok I obviously won’t cry over kale, but you can see just how much of a pain these local supermarkets are and just how much I am obsessed with kale. But hey, if you are gonna be obsessed with anything, then I feel ok being obsessed with a nutritional powerhouse superfood!

The kale smoothie I made today included fruits and veggies, but you can always go for veggies only if that’s what floats your boat. I personally think that fruits and veggies together taste great, plus then you are getting your required servings of both at once! That reminds me of another thing I love about smoothies…you can pack them with more nutrition than an average meal if you play your cards right. You can add all kinds of things in there like chia seeds, flax seeds, acai berries, and protein powders, just to name a few. The possibilities are endless. Smoothies are a great way to start your day, follow a workout, or even as a meal replacement. They are convenient and great for on-the-go, and let’s face it, just about anybody can manage to throw some things into a blender and give it a whirl. So for today’s smoothie, what I decided to pair up is kale and avocado, with an addition of some orange juice and fresh pineapple chunks. I don’t like my smoothies too thick, so I usually also add a bit of water. The beauty of smoothies is that you can customize it exactly to your own liking, so I suggest you follow this recipe loosely and use it as a starting point to your own super smoothie creations. But if I were you, I wouldn’t forget the kale. xoxo

Kale-Avocado Power Smoothie

by: Totes Yummy

Serves 1

Ingredients:

  • 1/2 cup orange juice (I used oj with pulp)
  • 1/2 cup cold water
  • 1/2 avocado
  • 1 cup fresh pineapple (chopped)
  • 2 cups fresh kale (mine came out to around 50g; leaves only, thick center part should be discarded)

Directions:

Add all ingredients into a blender, starting with the liquids and ending with kale. Blend until smooth. Serve.

(Average nutrition per serving: 230cal, 9g fat, 40g carbs, 7g fiber, 4g protein)

Scrumptious Tofu Scramble

Scrumptious Tofu Scramble – boy is that a mouthful or what? But it really is scrumptious so I couldn’t possibly use a better word to describe it. Plus it will make you want a mouthful of it, so it’s perfect. I got inspired to create this recipe by my sis in law Cat. She posted a similar recipe to her Facebook page a few weeks ago, but I didn’t have all the ingredients she used so I improvised and created my own. That’s the beauty of tofu scrambles, you can pretty much go wild and add all kinds of veggies and seasoning. Mine has a bit of a mexican influence and I like to serve it with my homemade whole wheat tortillas and a splash of hot sauce. Really yummy breakfast, lunch OR dinner! It’s super filling, healthy, and totes vegan too!!

Tofu is made from dried soybeans that have been ground, filtered, and boiled. It is important to know that most of the world’s soybeans are unfortunately genetically modified plants. So it is really important to get tofu that is made from non-GMO soya beans. Read the labels when buying your tofu and look for “certified organic” or “non-GMO” words or logos if available. I used firm tofu in this recipe, but you can also use soft. Soft tofu will turn out a bit more fluffy than the firm kind. Both are good, so use whichever one you prefer or have on hand.

Since I’ve stopped eating meat I have been discovering things like tofu to add protein to my diet. Tofu is high in protein, low in fat, and very low in saturated fat. Some studies show it can lower cholesterol and may even help prevent certain types of cancer. Tofu is a very filling, satisfying food that is low in calories, which makes it a good choice for those looking to lose weight. It is rich in iron, copper, manganese, calcium, omega-3, B-vitamins and selenium. However, too much of anything is never good. When it comes to eating tofu, or any other soy product, moderation is key. To read more about health benefits of tofu, click here.

Another cool property of tofu is that it absorbs the flavors of whatever it’s cooked with. So if you think tofu is bland and boring, think again! This tofu scramble for example really doesn’t have much taste of tofu at all. It tastes more like sautéed mexican veggies, yum! The key is to drain as much of the water as you can from the tofu before cooking with it. This will also help keep the consistency more solid. And now without further ado, here is my recipe for a totes scrumptious tofu scramble. Enjoy! xoxo

Scrumptious Tofu Scramble

by: Totes Yummy

Serves 2

Ingredients:

  • 1 tablespoon olive oil
  • 1/2 medium onion, chopped
  • 1/2 large red bell pepper, chopped
  • 1 large tomato, chopped
  • 1/2 avocado, chopped
  • 1 cup black beans, drained and rinsed
  • 300g firm tofu, drained & crumbled (soft tofu would also work)
  • salt & pepper to taste
  • red pepper flakes to taste (optional)

Directions:

Heat olive oil in a skillet over medium heat. Add the onion and sauté until lightly brown and turning translucent, around 5 minutes. Add the bell pepper and continue to sauté. Add the salt, pepper and red pepper flakes (if using). Stir in the crumbled tofu and continue cooking while stirring for a few minutes. Add the black beans, tomatoes and avocado and cook for just a minute or so to warm. Remove from heat and serve immediately. If you like it spicy add some hot sauce. Great on its own or wrapped in a tortilla (check out my recipe for homemade whole wheat tortillas here).

(Nutrition per serving: 350cal, 17.5g fat, 32.5g carbs, 13g fiber, 20g protein)

Whole Wheat Tortillas

It never occurred to me to make my own tortillas till recently! I’m not sure why, as they are evidently super quick and easy to make. They don’t carry whole wheat tortillas at my local grocery store so that is the main reason I wanted to experiment with these. It also doesn’t hurt to know that there are no preservatives or needless additives in these like in the store-bought tortillas. Substituting other flours would probably work great too. Brown rice flour or even coconut flour might be interesting. Next time I may also add some flaxseed meal to increase the nutritional benefits or some herbs to spice it up.

If you don’t have a tortilla press and are rolling these out by hand, it may take you some time till you are able to roll them out into perfect circles (or should I say anything that remotely resembles a circle). I personally don’t mind them not being perfectly round. It kind of gives them a rustic look. You can also customize the size you want your tortillas to be by starting with a bigger or smaller dough ball. They cook really fast, so make sure to watch them! They are best eaten right away, but can be stored for a few days in a an air-tight container in the fridge. Just make sure to reheat them, as they may get a little stiff. But what’s a tasty tortilla without something to put inside of it? Boooooring! Go wild with your imagination or stay tuned for a totes yummy recipe that goes hand in hand with these tortillas and takes them to a whole other level. xoxo

Whole Wheat Tortillas

by: Totes Yummy

Makes 8 medium-sized tortillas (yield depends on the size you make your tortillas)

Ingredients:

  • 1 1/2 cup whole wheat flour
  • 3 tablespoons olive oil
  • 1/2 tsp salt
  • 1 tsp baking powder
  • 1/2  cup warm water

Directions:

In a medium bowl mix together the flour, oil and salt. Add the warm water and stir until a rough dough is formed. Add a little extra water if needed. Knead the dough by hand until smooth. The dough should be soft and damp but not sticky. Cover the dough with plastic wrap and let rest for 20-30 minutes (up to 1 hour). Take a small portion, shape it into a ball and roll flat into a circle on a lightly floured surface (or use a tortilla press if you have one). The dough should be very thin, but if you like your tortillas a bit thicker then don’t roll them out as much. Heat a pan over medium-high heat (the pan does not need to be greased). Drop the rolled out dough on the VERY hot pan and cook until bubbles form, around 30-45 seconds. Flip and cook until raised bubbles are golden brown. These will cook very fast, so be sure to watch them! Don’t overcook them, as this will make them dry and hard. Stack your tortillas on top of each other in a kitchen towel to keep them warm (this will also help keep them soft). Serve immediately or store in an air-tight container in the fridge for a few days. For optimal results reheat before use.

(Nutrition per tortilla: 80cal, 3.6g fat, 11g carbs, 1.9g fiber, 2g protein)

Creamy Dreamy Cashew Milk

Are you guys ready to have your minds blown by how easy and simple it is to make your own nut milk?! It only requires a few ingredients and about 5 minutes of active work! Yes I said 5 minutes. Not only is it easy, it’s also totes natural and free of additives that store-bought nut milks contain. By making your own nut milk you get to control the sweetness and overall taste by adding different ingredients to it, and the best part is…….wait for it………it tastes a million times better than the store-bought stuff and no cows were harmed in the making of it! Yayyyy! It’s creamy, dreamy and simply delicious. For a must try recipe, read on!

So far I have tried homemade cashew milk, almond milk, and brown rice milk. My personal favorite is cashew milk because it has a very mild, and not at all overpowering taste of cashews. For this reason I decided to feature the recipe using cashews, but you can use other nuts instead if you prefer, such as almonds, hazelnuts or walnuts. Using nuts as the base for the milk results in a dairy and lactose free beverage, which is not only healthy but can be a tasty essential for lactose intollerant people.In my recipe I used honey and dates as sweeteners, but if you would like to make the milk vegan friendly, instead of honey you could use only dates or perhaps pure maple syrup or stevia. I will post the recipe that to me personally tastes perfect, but by all means adjust the sweetness and flavors to your own liking. In fact you may like the milk completely plain, using only water and cashews! That will certainly reduce the calories, and it might be good for using in soups or other savory dishes, but I needs me some sweetness in my cashew milk!

Since you are in control, you also get to decide how thick and creamy you want your milk to be. Start with less water and add more as you blend until you reach the desired consistency. Add less water for a more creamy milk. And if you want it to be super-duper thick and be used as a coffee creamer for instance, reduce the amount of water even more.

An important thing to know is that you need to buy raw cashews for this! Not the roasted salted kind! Raw cashews need to be soaked for at least a few hours before using for milk, but I always soak mine overnight. Leave them to soak in a covered container, and if your kitchen gets hot like mine, preferably in the fridge. You can leave the nuts soaking for up to 48 hours, after that they are no longer good to use. After soaking, the recipe is pretty straight forward and super quick and easy. Just blend the nuts with water using a blender and add the optional ingredients for taste. Depending on how powerful your blender is, you may need to blend for a few minutes until all the chunky parts are really fine. And now for the final very important step, you will need a nut bag, muslin cloth or some other kind of very fine mesh to strain the milk.

This step is really important because if you don’t strain the milk, even though it looks smooth, you will totes taste all the little chunky particles. Not cool! Make sure to really squeeze  the muslin and get all the milk out, or alternatively leave it to sit and strain on its own for a while. And that’s it! You’ve got yourself some smooth, creamy, very dreamy cashew milk. But don’t waste what’s left in the muslin cloth! The remaining part is known as cashew pulp and, in my recipe, will have little chunks of dates in it as they never really blend all the way. Yummy on its own as a spread, but can also be used in a variety of recipes such as cookies, cakes, or muffins! If you have any other cool ideas for the use of cashew pulp do let me know in the comments bellow.

I don’t drink regular milk anymore, and even back when I did, I would never just grab a glass of milk on its own, never! But with this stuff it’s a whole different story. I love to take a fancy glass, add some ice and this creamy cashew milk and sip on its own. It’s also amazing with cereal and in coffee or tea. But the possibilities are endless. Use it instead of milk in all kinds of recipes for guaranteed totes yummy results! xoxo

Creamy Dreamy Cashew Milk

by: Totes Yummy

Makes around 5 cups

Basic ingredients:

  • 1 cup raw cashews
  • 2 cups filtered water for soaking
  • 4-5 cups additional filtered water for milk (I used 4.5 cups)

Optional additions that I used:

  • 1 tablespoon honey
  • 3 dried pitted dates
  • 1 tsp vanilla extract
  • pinch of salt

Update: Additional optional ingredients that can be used are: 1 tablespoon coconut oil, a pinch of cinnamon, and/or a pinch of nutmeg. I orginally posted the recipe using coconut oil, but have since made a batch or two without it and came to like it better. Coconut oil is suppose to make the milk more creamy, which it does, but to me it was creamy enough without it so I decided to omit it from now on. The recipe and the nutritional information now reflect this update.

Directions:

Soak the cashews for at least a few hours or overnight. Drain the cashews and rinse until water runs clear. Add the cashews and 4-5 cups filtered water to the blender and blend for a few minutes. If you are making this for the first time, add the water a cup at a time until you have reached the desired consistency. I used 4.5 cups and it was perfect! Now add any or all optional ingredients to the blender and mix for another minute or until well blended. Strain the milk using a nut bag, muslin cloth or another form of a very fine mesh. Chill before serving, then store in a covered container in the fridge. The milk will keep for 3 days.

(Nutrition per 1/2 cup serving: 64cal, 4g fat, 7.3g carbs, 0.5g fiber, 2g protein)